
The first step to a truly clean bed is simple: vacuum away the dust and debris, spot-treat any stubborn stains with a gentle detergent mix, and let baking soda work its magic to neutralise odours. This straightforward routine is your best bet for keeping allergens, dust mites, and strange smells at bay, ensuring your bed is a fresh, hygienic place to rest.
Why Cleaning Your Mattress Is Non-Negotiable
Let's be real—your mattress puts in a lot of work. It’s one of the most-used items in your home, but it's easy to forget what builds up on the surface where you spend roughly a third of your life. Over time, it can become a haven for things you'd really rather not sleep with.
Think of regularly cleaning your mattress not as a chore, but as an essential part of maintaining a healthy home. This is particularly important here in New Zealand, where our humid climate can create the perfect breeding ground for microscopic critters.
Every night, you're potentially sharing your bed with an accumulation of:
- Dead Skin Cells: We all shed them, and they’re the primary food source for dust mites.
- Dust Mites: These tiny creatures love warm, humid spots like bedding. Their waste is a major trigger for allergies and asthma.
- Sweat and Body Oils: Over months and years, moisture and oils seep into the fabric, leading to yellowing and musty odours.
- Allergens: Pollen, pet dander, and dust from around the house inevitably settle on your mattress, which can seriously disrupt your sleep.
The Unseen Impact on Your Sleep and Health
A grubby mattress doesn't just look and feel a bit grim; it can directly affect your health. The build-up of allergens can trigger sneezing fits, itchy eyes, and a stuffy nose—none of which are conducive to a good night's sleep. For a deeper dive, check out our guide on enhancing sleep quality in New Zealand.
A clean sleeping environment is foundational to good health. By neglecting your mattress, you're potentially compromising your respiratory health and overall sleep quality night after night.
This isn't just about hygiene; it’s about protecting your investment. A well-cared-for mattress lasts longer and gives you better support. With the average Kiwi spending over 2,500 hours a year in bed, a clean mattress should be a top priority.
Setting the Stage for a Cleaner Bed
Before we get into the nitty-gritty, it helps to understand the difference between sanitizing and cleaning. This guide is all about effective cleaning—removing the physical dirt, stains, and allergens. The following sections offer practical, no-nonsense steps to transform your bed into a genuinely fresh and healthy sanctuary.
Your Simple Mattress Cleaning Toolkit
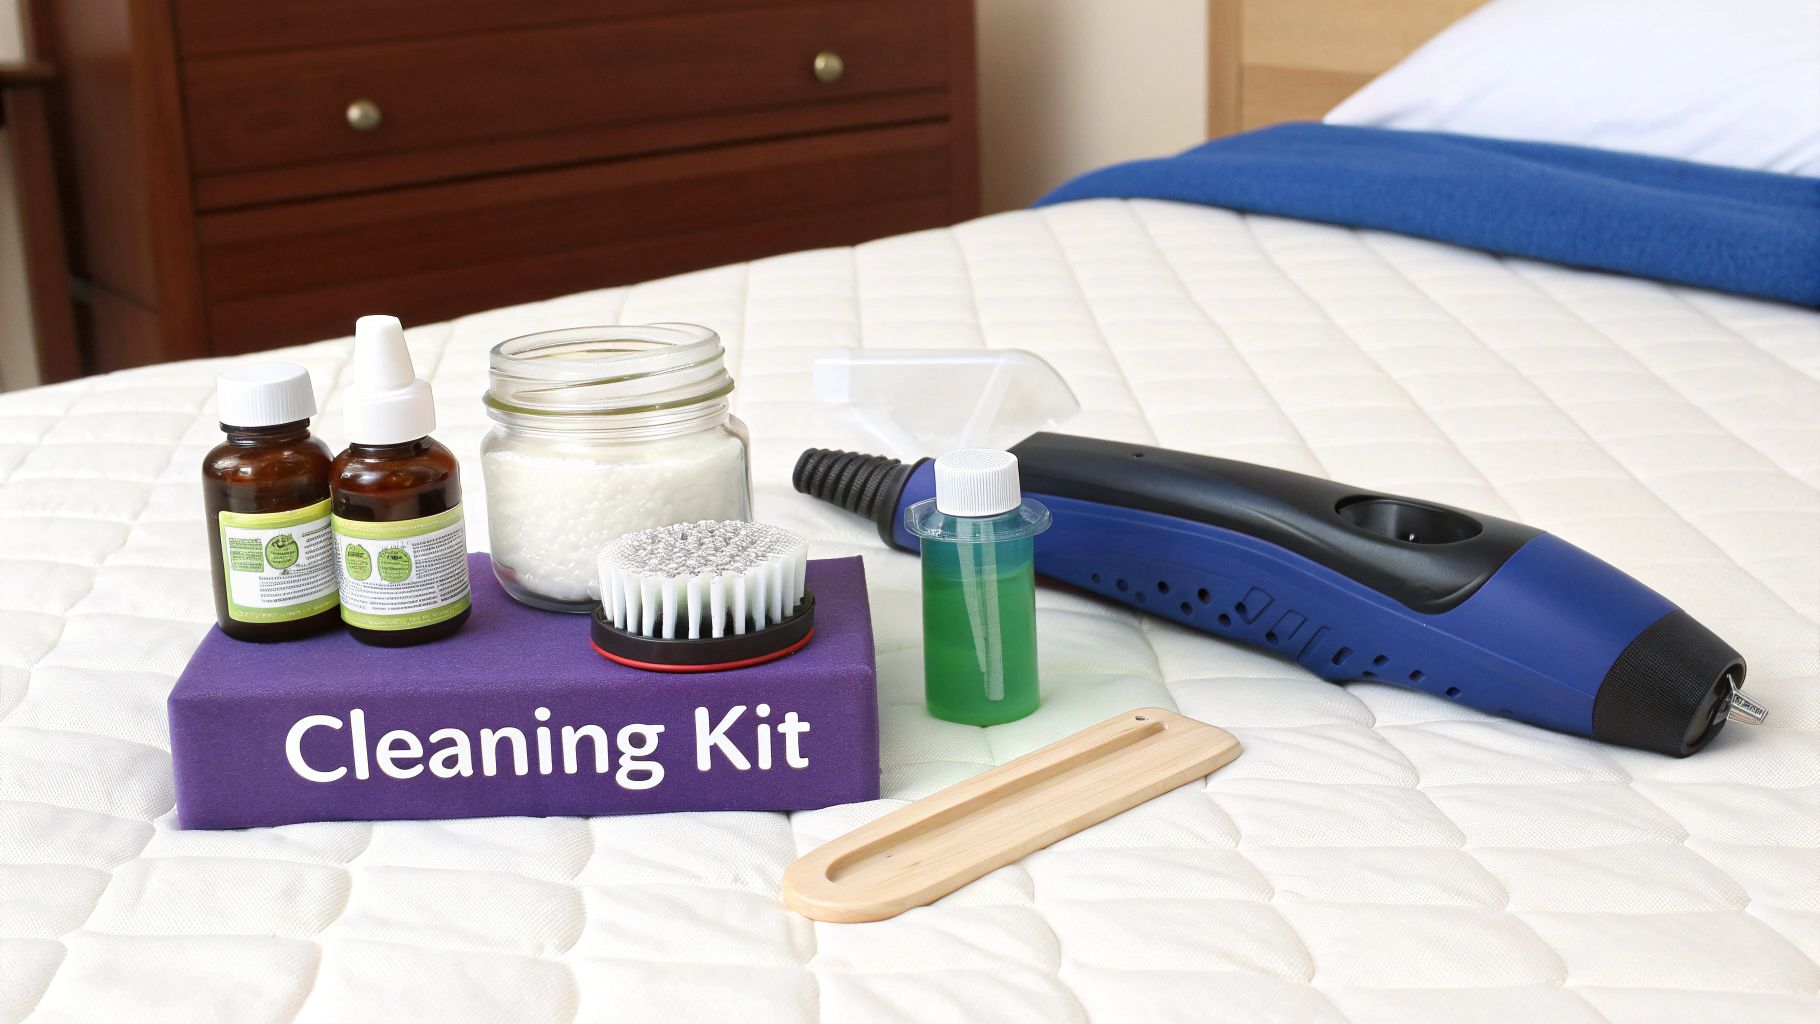
Before you start pricing out professional cleaning services or buying expensive gadgets, have a quick look in your cupboards. You'll be surprised to find that you probably already own everything you need to give your mattress a really effective clean. This isn't about dousing your bed in harsh chemicals; it's about using simple, powerful household staples to get the job done right.
Knowing how to clean a mattress properly starts with getting the right tools together. A handful of basic items is all it takes to tackle dust, get rid of lingering odours, and handle most common spills. The best part? This approach is not only cheap but also much kinder to your mattress fabric and the air you breathe all night.
The Essential Cleaning Crew
Let's pull together your simple but mighty toolkit. Each of these items has a specific job to do when it comes to bringing freshness back to your bed.
-
A Vacuum Cleaner with an Upholstery Attachment: This is your number one tool for getting rid of dust, dead skin cells, and other allergens. If your vacuum has a HEPA filter, that's a huge bonus—it traps those tiny microscopic particles instead of just spitting them back into the room.
-
Baking Soda (Bicarbonate of Soda): This humble kitchen staple is an absolute cleaning superstar. It's a natural deodoriser that works wonders on neutralising acidic odours from sweat and spills, leaving your mattress smelling clean and fresh.
-
Plain White Vinegar: A fantastic natural disinfectant and stain remover. Vinegar is great at breaking down many common stains without resorting to aggressive chemicals. The easiest way to use it is by mixing it with water in a spray bottle.
-
Clean Cloths or Sponges: You’ll need a few of these for blotting stains and applying your cleaning solutions. I always recommend using a white or light-coloured cloth just to be safe and avoid any accidental colour transfer onto your mattress.
A key piece of advice I always give: the goal is to use as little liquid as possible. A damp cloth is all you need. A soaking wet one can let moisture seep deep into the mattress, which is a perfect recipe for mould and mildew.
A Few Optional Extras
While the essentials will get you most of the way there, a few other bits and pieces can make the job a little easier and even more effective. Think of them as the supporting cast that helps the main crew shine.
Consider adding these to your kit if you have them:
- An Old Toothbrush: Perfect for gently working a cleaning paste into a stubborn, set-in stain without being too rough on the fabric.
- Essential Oils: I love adding a few drops of lavender or eucalyptus oil to the baking soda before sprinkling it on. It leaves a subtle, calming scent behind.
- A Sifter: A simple kitchen sifter helps you spread the baking soda evenly across the entire mattress surface, giving you consistent coverage for the best deodorising results.
With these simple tools ready to go, you’re all set for the task ahead. Of course, prevention is always better than cure; a good quality cover can save you a lot of cleaning effort down the track. If you're looking for one, you can learn more about choosing a waterproof mattress protector and see how it can safeguard your investment.
The Routine Clean: Your Go-To for Any Mattress
Think of this as your essential mattress maintenance plan. It’s a simple but incredibly effective routine that keeps your bed fresh, hygienic, and free from the nasty stuff you can’t see. This process is your first line of defence against the slow build-up of dust, skin cells, and allergens, and the best part is, it works beautifully for most common mattress types—innerspring, memory foam, and latex included.
What I love about this method is its simplicity. You don't need any fancy equipment or harsh chemicals, just a bit of time and a few things you probably already have in your pantry. Making this a regular habit really does extend the life of your mattress and, more importantly, creates a healthier place for you to sleep.
First Up, Strip the Bed
Right, let's get started. The first move is to strip the bed completely. Everything comes off—pillows, duvet, mattress protector, the lot. This is the perfect chance to get all your bedding into the wash while you tackle the mattress itself.
If the care labels allow, wash your sheets and pillowcases in hot water. This is a game-changer for killing off dust mites and bacteria. In fact, studies have found that washing at 60°C can eliminate 100% of dust mites, which is fantastic news for anyone with allergies.
A quick tip before you start: get some air moving. Open up the windows and doors to ventilate the room. It helps clear out any dust you dislodge and will make a big difference to the drying time later on.
Once the bedding is tumbling away in the machine, you're left with a bare mattress, ready for what I think is the most satisfying part.
The Power of a Good Vacuum
Now it’s time to grab your vacuum cleaner. Don't underestimate this step; it's surprisingly effective at pulling out an incredible amount of unseen grime. You’re not just skimming the surface—you're lifting out dust, dead skin cells, pet dander, and all sorts of tiny particles that have worked their way deep into the fabric.
Using your vacuum’s upholstery attachment, work your way methodically across the entire top surface in slow, overlapping strokes. Pay close attention to the seams, crevices, and any quilting details, as this is exactly where debris loves to hide. Once the top is done, give the sides a good vacuum too.
A few pointers for getting the best results:
- Use the right tool. Your vacuum’s upholstery attachment is designed for fabric and gives the best suction without causing any damage. The crevice tool is your best friend for getting right into those tight seams and corners.
- Take your time. Rushing this will leave a lot of gunk behind. Slow, deliberate passes give the vacuum a chance to really pull up all the embedded particles.
- Flip it, if you can. If you have a flippable mattress, give the other side the same thorough treatment.
Deodorise with Baking Soda
With all the surface debris gone, it's time to deal with any lingering odours. This is where a simple box of baking soda from your kitchen really proves its worth. Baking soda (sodium bicarbonate) is a natural deodoriser that actually neutralises odours instead of just covering them up.
Sprinkle a generous layer of baking soda over the entire mattress. Don't be shy with it—you're looking for a thin, even coating across the whole top. A kitchen sifter is a great little hack for distributing it evenly without getting any clumps.
For the best results, let the baking soda sit for at least 30 minutes. But honestly, if you have the time, leaving it for a few hours—or even a full day while you're out—will work wonders. The longer it sits, the more moisture and odour it can absorb from deep within the mattress fibres.
The Final Vacuum Pass
Once the baking soda has worked its magic, it's time for one last vacuum. Go over the mattress thoroughly again, making sure you suck up every last bit of the powder. Use the same slow, methodical approach you did the first time around.
When you’re done, your mattress won't just be cleaner; it will feel and smell noticeably fresher. Let it air out for a little while longer, then make the bed with your lovely clean sheets. This simple routine, done every few months, is the absolute key to keeping your bed a clean and inviting place to rest your head.
How to Tackle Common Mattress Stains
Spills and accidents are just a part of life, and it seems the mattress is often in the firing line. Whether it’s that morning coffee, a glass of wine at the end of the day, or an accident from a child or pet, stains happen. Before you start to panic, just know that quick, targeted action is your best bet.
The golden rule here is to blot, never rub. It’s an instinct to want to scrub a stain away, but this just pushes it deeper into the mattress fibres and can damage the fabric. Your goal is always to lift the stain out, not grind it in.
The First Response Team for Fresh Spills
When it comes to spills, speed is everything. The sooner you get to it, the less chance it has to soak into the deeper layers—which is especially crucial for materials like memory foam that really don’t like getting wet.
Here's what to do the moment a spill happens:
- Grab a clean, dry cloth or paper towel. Immediately start blotting the spill, applying firm pressure to soak up as much liquid as you can.
- Work from the outside in. Start blotting at the edge of the stain and move towards the centre. This simple trick stops the stain from spreading and getting bigger.
- Keep going until the cloth comes away dry. Switch to fresh sections of the cloth or new paper towels until you can’t absorb any more moisture.
Honestly, this initial blotting can solve most of the problem and makes any follow-up cleaning much more effective.
Tackling Specific Stain Types
Not all stains are created equal, and different spills need slightly different tactics. The good news is, most can be handled with simple things you probably already have in your pantry. Just remember to always test any cleaning solution on a small, hidden spot on your mattress first.
Urine and Sweat Stains
These protein-based stains are incredibly common and can leave behind yellowing and that distinct ammonia-like smell.
A simple vinegar solution is your go-to for this job. Mix equal parts white vinegar and water in a spray bottle. Lightly mist the stained area—you don't want to saturate it—and let it sit for about 10-15 minutes. Gently blot the area again with a clean, dry cloth to lift the moisture.
Next, generously sprinkle baking soda over the damp spot. The baking soda is a fantastic deodoriser that also helps draw out any remaining moisture. Let it sit for several hours (overnight is even better), then vacuum it all up thoroughly. For more advice on this common problem, our guide on how to remove stains from a mattress has some extra tips.
Blood Stains
The number one rule with blood is to always use cold water. Hot water will cook the protein in the stain, setting it permanently and making it nearly impossible to remove.
Start by lightly dampening a clean cloth with cold water and blotting the stain. If it’s stubborn, you can try applying a tiny amount of hydrogen peroxide directly to the stain. You'll see it fizz and bubble as it works to break down the blood. Carefully blot the residue away with another cold, damp cloth and let it air dry completely.
A Quick Word of Caution: Hydrogen peroxide is a mild bleach, so use it sparingly and always test it on a hidden part of your mattress first to make sure it doesn't discolour the fabric.
Coffee, Wine, and Drink Stains
These tannin stains usually respond well to a gentle detergent mix.
Combine a few drops of a mild, clear dish soap with a bit of warm water. Dip a clean cloth into just the suds (not the water) and gently dab at the stain. The idea here is to use the cleaning power of the soap with as little moisture as possible. Blot with a clean, damp cloth to "rinse" the area, then blot dry with a fresh towel.
This flowchart gives a good visual on whether your mattress type can handle more intensive, water-based cleaning or needs a more delicate, spot-treatment-only approach.
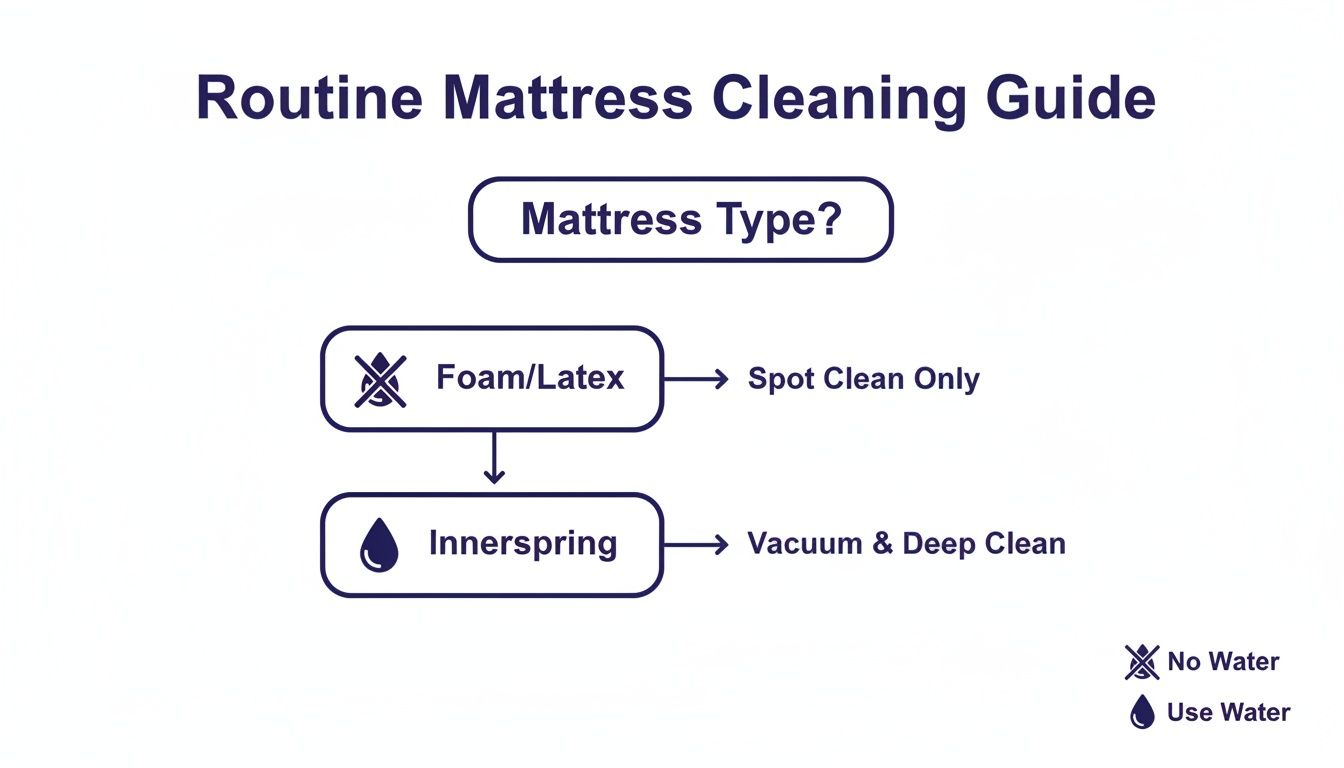
As you can see, foam and latex mattresses are very sensitive to too much water, while innerspring models can generally handle a slightly more robust clean.
When Mould and Mildew Appear
In New Zealand's humid climate, mould can creep in if a mattress gets damp and isn't able to dry out properly. This is something you need to take seriously, as mould spores can be harmful to your health.
A solution of equal parts white vinegar and water can work wonders on surface mould. Lightly spray it onto the affected area, let it sit for an hour, and then wipe it down with a damp cloth. For stubborn spots, some of the techniques for other fabrics can be adapted. For example, guides on how to remove mould from carpet often have useful methods that could offer more insight.
After any kind of treatment, making sure the mattress is 100% dry is absolutely essential before you even think about putting sheets back on. Open a window, set up a fan—do whatever you can to get the air circulating and speed up the drying process. A damp mattress is just an invitation for mould and mildew to come right back.
Long-Term Care and Deep Cleaning Secrets
Spot cleaning and regular vacuuming are great for keeping your mattress tidy day-to-day, but what about the long game? To really get the most out of your mattress, you need a simple, sustainable plan. This is all about creating a routine that not only keeps your bed fresh but also helps it last longer, protecting your investment for years to come.
Deep cleaning isn't a weekly chore. Think of it as a proper reset for your sleep surface, something you'd do a couple of times a year. When you combine this deep clean with a few smart preventative habits, you can seriously cut down on the build-up of allergens, moisture, and general wear and tear.
The Classic Kiwi Sun Treatment
Here in New Zealand, we all know the magic of a sunny day for getting the laundry dry, and the exact same principle works wonders for your mattress. Giving your mattress a good airing out in the sun is a classic, effective, and completely free way to deep clean it.
The sun’s UV rays are a natural disinfectant, killing off bacteria and dust mites that have burrowed deep inside the fibres. Plus, that fresh air is fantastic for getting rid of any stubborn odours that the baking soda might have missed.
Just pick a dry, sunny day, haul your mattress outside, and prop it up against a wall, a fence, or a couple of outdoor chairs. Let it bask for a few hours, then remember to flip it over so the other side gets a chance to see the sun.
A quick heads-up, though: while the sun is great for most mattresses, it can be a bit harsh on certain materials.
- Memory Foam and Latex: These can be a bit sensitive. Too much direct sunlight can cause the foam to yellow or even start breaking down over time. It's much safer to air these types out in a well-ventilated room near an open window, or in a shady spot outside.
- Innerspring: These are generally tough enough to handle a good few hours in the direct sun without any problems.
Your Six-Month Deep Clean and Rotation Schedule
When it comes to mattress care, consistency is everything. A simple six-monthly schedule removes the guesswork and makes sure these important jobs actually get done.
Here’s a straightforward routine to follow twice a year:
- Do a Full Deep Clean: Go through the entire cleaning process – vacuum thoroughly, deodorise with a generous layer of baking soda, and spot-treat any new marks you find.
- Give it an Airing: If the weather's good and your mattress type is suitable, this is the perfect time for that sun treatment we just talked about.
- Rotate Your Mattress: This is the step everyone forgets, but it's so important. Rotating your mattress 180 degrees (from head to toe) helps it wear evenly, preventing those annoying dips and sags from forming in your usual sleeping spot.
If you happen to have an older, two-sided mattress, you can flip it over entirely. Most modern mattresses, however, are one-sided and should only be rotated.
Rotating your mattress regularly is the single best thing you can do to prevent premature sagging. It distributes the pressure evenly across the whole surface, which can significantly extend its supportive lifespan.
The Ultimate Defence: A Quality Mattress Protector
If there's one secret weapon in the battle to keep your mattress pristine, this is it. A good quality mattress protector is, hands down, the best investment you can make. It's the non-negotiable barrier between you and the mattress itself.
Think of it this way: a protector stops spills, sweat, skin cells, and allergens from ever touching the mattress fabric. It's a heck of a lot easier to whip off a protector and throw it in the washing machine than it is to deal with a big stain in the middle of the night.
A waterproof yet breathable protector is the gold standard. It blocks liquids completely but still allows air to circulate, so you don't overheat. Keeping your mattress in prime condition is a key factor in how long it will serve you well. To understand more, you can learn about how long a mattress should last and see how proper care plays a huge role. Seriously, investing in a protector from day one is the most effective way to get every last year of comfort out of your bed.
Cleaning Tips for Different Mattress Types
It’s tempting to think all mattresses can be cleaned the same way, but that’s a fast track to ruining a good bed. The truth is, your cleaning method needs to match your mattress material. What works for a sturdy innerspring could wreck a delicate memory foam mattress.
The biggest factor is how each material reacts to water. Some can take a bit of moisture, while others will soak it up and refuse to let go. Getting this wrong is especially risky in New Zealand's often humid climate, where trapped dampness can quickly turn into a mouldy mess.
How to Clean a Memory Foam Mattress
Think of memory foam as a high-tech sponge. It’s brilliant for comfort, but that same absorbency makes it a nightmare if it gets too wet. The number one rule is to use as little liquid as humanly possible. Any moisture that gets deep inside can damage the foam's structure and become a breeding ground for mildew.
For memory foam, gentle and targeted is the only way to go.
- Spot-Clean Only: Never, ever soak a memory foam mattress. If you have a spill, blot it up immediately. For stains, use a cloth that’s just barely damp with a tiny bit of mild detergent.
- No Harsh Cleaners: Forget about bleach, ammonia, or any other strong chemical. They will literally eat away at the foam over time.
- Gentle Vacuuming: When vacuuming, always use the soft brush attachment. The last thing you want to do is snag or tear the cover.
Because memory foam is so dense, it takes forever to dry. You must be absolutely certain any damp spots are 100% dry before you even think about putting sheets back on. A fan or a hairdryer on a cool setting can really help.
If you're weighing up your options, it's worth learning more about memory foam mattresses in NZ to understand their specific care needs.
Cleaning Innerspring and Latex Mattresses
Good old-fashioned innerspring mattresses are the hardiest of the lot. Thanks to their coil and fibre construction, they can handle a slightly more thorough clean. You can be a bit more confident with standard spot-cleaning methods, but you still need to avoid soaking the inner padding.
Latex mattresses are a different story. They’re tough in their own way but need a gentle touch, much like memory foam.
While latex is a durable, natural material, it has its weaknesses: harsh chemicals and direct sun. When you’re cleaning a latex mattress, remember to:
- Use Mild, Natural Mixes: A simple solution of mild soap and water is all you need.
- Avoid Chemicals at All Costs: Bleach and strong solvents will cause the latex to oxidise and become brittle, eventually breaking it down.
- Keep it Out of the Sun: An innerspring might enjoy a good airing in the sun, but direct sunlight will cause latex to deteriorate. Always dry it in a shady, well-ventilated spot instead.
Knowing these little details from the start is what will keep your mattress in top shape for years.
Mattress Type Cleaning Cheat Sheet
To make things easier, here’s a quick-reference table that breaks down the do's and don'ts for each mattress type. It's a handy guide for those "what do I do now?" moments.
| Mattress Type | Best Cleaning Method | What to Avoid |
|---|---|---|
| Memory Foam | Spot-cleaning with a barely damp cloth and mild detergent. Gentle vacuuming with a soft brush. | Soaking, harsh chemicals (bleach, ammonia), aggressive scrubbing, heat. |
| Latex | Spot-cleaning with a mild soap and water solution. Air dry in a shady, well-ventilated area. | Harsh chemicals, solvents, direct sunlight, excessive moisture. |
| Innerspring | Spot-cleaning with mild detergent. Can handle slightly more moisture than foam or latex. Sun-drying is okay. | Soaking the inner layers, using very strong chemical cleaners that might damage fibres. |
Ultimately, treating your mattress with the right care based on its material will not only keep it clean but also significantly extend its life.
Got Questions About Cleaning Your Mattress? We've Got Answers.
Even with the best guide, a few questions always seem to come up. It's one thing to read the steps, but another to tackle a real-life spill or a persistent smell. Let's run through some of the most common queries I hear from people, so you can feel confident you're doing the right thing for your mattress.
Think of this as the troubleshooting section—the part where we tackle those little "what if" scenarios that can make all the difference in protecting your investment.
How Often Should I Really Be Cleaning My Mattress?
As a general rule of thumb, aim for a proper deep clean twice a year—maybe when you're switching out your seasonal duvet. But for ongoing maintenance, a monthly vacuum is a must, especially with New Zealand’s humidity. This quick job does wonders to keep dust mites and allergens from settling in.
Of course, life happens. If you have allergies, let a furry friend share the bed, or have young kids, you’ll probably want to vacuum and spot-clean more often. And remember, the absolute best time to clean a spill is the second it happens. Don't wait!
Is It Okay to Use a Steam Cleaner on My Mattress?
This is a big one, and my advice is almost always a firm "no." While it sounds like a fantastic way to kill germs, steam cleaners introduce a dangerous combination of intense heat and moisture. For materials like memory foam or latex, this can be a real disaster.
The biggest problem isn't the heat—it's the moisture. Water gets forced deep into the mattress layers where it can't escape, creating a perfect, hidden breeding ground for mould and mildew. Trust me, that's a much bigger headache than the original stain ever was.
What's the Best Way to Dry a Mattress After Cleaning?
First off, the golden rule is to use as little liquid as you can possibly get away with. Once you've blotted up as much moisture as possible with a dry cloth, it’s all about airflow.
Here are a few tricks that work well:
- Aim a fan directly at the damp spot to keep the air moving.
- Grab a hairdryer but only use the cool setting. Applying heat can damage the foam and actually set stains permanently.
- On a dry, breezy day, letting the mattress air out in a well-ventilated room or a shady spot outside works wonders.
Whatever you do, make sure the mattress is 100% bone dry before putting any sheets back on.
I've Cleaned It, But My Mattress Still Smells. What Now?
If a single round with baking soda didn't quite do the trick, don't give up. It sometimes needs a second go. This time, be really generous with the baking soda and leave it on for as long as you can—even up to 24 hours—to give it time to absorb everything. For a little extra oomph, you can mix a few drops of lavender essential oil into the bicarb before sprinkling it over.
If a musty smell just won't budge, it could be a sign that moisture is trapped deep inside. Your best bet is to air the mattress out (preferably outside on a dry, sunny day, if your mattress type allows it). If that still doesn't work, it might be time to call in a professional.
Ready for a better night's sleep on a fresh, supportive bed? At New Zealand Bed Company, we've been helping Kiwis find their perfect mattress since 1986. Explore our wide range of quality beds and find the ideal match for your comfort and budget. https://nzbeds.co.nz