
Discovering a stain on your mattress is frustrating, but tackling it is easier than you think. You don't need a shelf full of harsh chemicals; most spills can be handled with simple household items like baking soda and vinegar. The trick is to act fast—blotting the spill immediately, applying a gentle cleaning solution, and letting it dry completely is your recipe for a spotless result.
This guide will walk you through exactly what to do, step by step.
Your Guide to a Spotless Mattress Starts Here

We’ve all been there—that sinking feeling when you spot a fresh coffee spill or an old, mysterious yellow mark on your bed. It’s a universal moment of dread. But you're in the right place. Think of this as your practical plan for tackling those blemishes and getting your mattress looking fresh again.
Your mattress is a huge investment in your health, so keeping it clean is more than just about appearances. Stains can quickly lead to unpleasant odours, bacteria growth, and can even attract dust mites, which just love a damp environment.
Why Acting Fast Is Your Best Bet
When it comes to spills, time is not on your side. Fresh, liquid stains are far easier to lift because they haven’t had a chance to seep deep into the mattress fibres and set. Once they bond with the fabric, the job gets a lot tougher.
The golden rule of stain removal is to act immediately. Your most powerful first move is to blot, never rub. Rubbing just spreads the stain and grinds it deeper into the mattress, making your job ten times harder.
This immediate action can be the difference between a five-minute cleanup and a permanent mark. It's especially true for common culprits like urine, blood, or red wine, which can set in minutes.
Mattress stains are a surprisingly common issue right here in New Zealand. Research shows that up to 70% of Kiwi households report noticeable stains within the first five years of buying a mattress, often from everyday spills or sweat buildup during those humid Auckland summers. You can find more details on how Kiwis handle mattress cleaning over at jae.co.nz.
Your First-Response Cleaning Plan
Before you rush out to buy expensive, specialised chemicals, take a look in your kitchen pantry. Your most effective cleaning tools are often the simple, powerful ingredients you already have in your Kiwi home.
Here's your initial game plan:
- Absorb the liquid: Grab clean, dry cloths or paper towels and blot the area firmly. Your goal is to soak up as much of the spill as you can before it sinks in.
- Apply a gentle solution: A simple mix of mild dish soap and water or a paste made from baking soda can work wonders on fresh stains.
- Let it dry properly: This is a crucial final step. Ensuring the mattress is completely dry afterwards is the only way to prevent mould and mildew from taking hold.
The following sections will dive into specific recipes and methods for different types of stains, but understanding this basic framework gives you the confidence to tackle any spill the moment it happens.
The Tools You’ll Need (And How to Make Your Own Cleaners)
Before you tackle any mattress stain, you’ll want to get your gear ready. The good news? You don’t need a whole arsenal of expensive, specialist cleaners. Most stains can be sorted with a few simple things you’ve probably already got in the pantry.
Think of it as your first-response kit for mattress mishaps. Being prepared means you can act quickly, and speed is everything when it comes to stopping a small spill from setting in for good.
Your Pantry-Powered Cleaning Kit
Often, the most effective stain removers are the ones we overlook. These everyday household items are surprisingly tough on common stains but gentle on most mattress fabrics (when you use them right, of course).
Here’s what you should always have on hand:
- Baking Soda: Your absolute best friend for soaking up moisture and killing odours. It's a fantastic, gentle abrasive that helps lift stains without being harsh on the fabric.
- White Vinegar: The acidity in white vinegar is brilliant for breaking down stains like sweat or urine. I always recommend keeping a spray bottle handy with a half-vinegar, half-water mix for a quick, effective cleaning spray.
- Hydrogen Peroxide (3%): This is the one to reach for when you're dealing with stubborn organic stains, especially blood. Just be aware it can have a mild bleaching effect, so it’s crucial to test it on a small, hidden spot first.
- Mild Dish Soap: A couple of drops in some water is all you need for greasy or oily marks. Just make sure you grab a clear, dye-free soap that doesn't contain any bleach.
These basic ingredients are the building blocks for countless cleaning solutions. It’s a principle that applies to more than just mattresses, too. You'll find similar ingredients in guides for making DIY solutions for tough stains like rust on all sorts of surfaces, which just goes to show how versatile they are.
Essential Application Tools
Having the right cleaners is only half the job. How you apply them is just as important, because the last thing you want to do is make the stain worse by pushing it deeper into the mattress fibres.
Make sure you have these essentials:
- Clean Microfibre Cloths: Always use white or light-coloured cloths to be certain no dye transfers to your mattress. You'll need a few—one for applying the cleaner and a couple of dry ones for blotting.
- A Spray Bottle: This is non-negotiable. It lets you apply your cleaning mix in a fine, even mist. Soaking your mattress is a huge mistake, as leftover moisture can quickly lead to mould and mildew.
- A Vacuum with an Upholstery Brush: You’ll need this for the final clean-up. Once your baking soda or cleaning paste has done its job and dried, a quick vacuum ensures no residue is left behind.
Expert Tip: Never, ever pour liquid directly onto your mattress. Always put it on your cloth first or give the area a very light misting from your spray bottle. This gives you total control and prevents over-saturating the mattress.
Simple, Safe DIY Cleaning Recipes
Ready to mix up some magic? These two recipes will handle most of the common stains you'll encounter. They're cheap, easy to make, and safe for the vast majority of mattresses. For a deeper dive, check out our full guide on how to clean your bed properly.
1. The All-Purpose Stain-Lifting Paste
This is my go-to for drawing stains out while absorbing odours at the same time.
- Mix 1/2 cup of baking soda with 2-3 tablespoons of water.
- Stir them together until you have a thick paste, a bit like toothpaste.
- Spread it over the stain, leave it to dry completely (give it at least 30 minutes), and then vacuum it all up.
2. The Disinfecting and Deodorising Spray
This one is perfect for refreshing the fabric and tackling those acidic stains.
- Fill a spray bottle with equal parts white vinegar and water.
- For a nicer smell, add a few drops of an essential oil like lavender or tea tree.
- Lightly spray the stained area, let it work for about 5-10 minutes, then blot it firmly with a clean, dry cloth until it’s as dry as you can get it.
Actionable Methods For Common Mattress Stains
Alright, with your cleaning kit assembled, it's time to get stuck in and tackle those stains. It’s important to remember that different spills demand different tactics. Nailing the right technique is often the difference between a mattress that looks brand new and one with a permanent blemish. This is where we get hands-on with the most common stains we see in Kiwi homes.
We’ll break down the best methods for each specific type of mark, from fresh spills to those older, mysterious patches. The goal is always the same: lift the stain out without completely soaking the mattress fabric. Too much moisture is a recipe for mould and mildew, and nobody wants that.
This flowchart gives you a quick visual guide for figuring out what to do based on the stain you're dealing with.
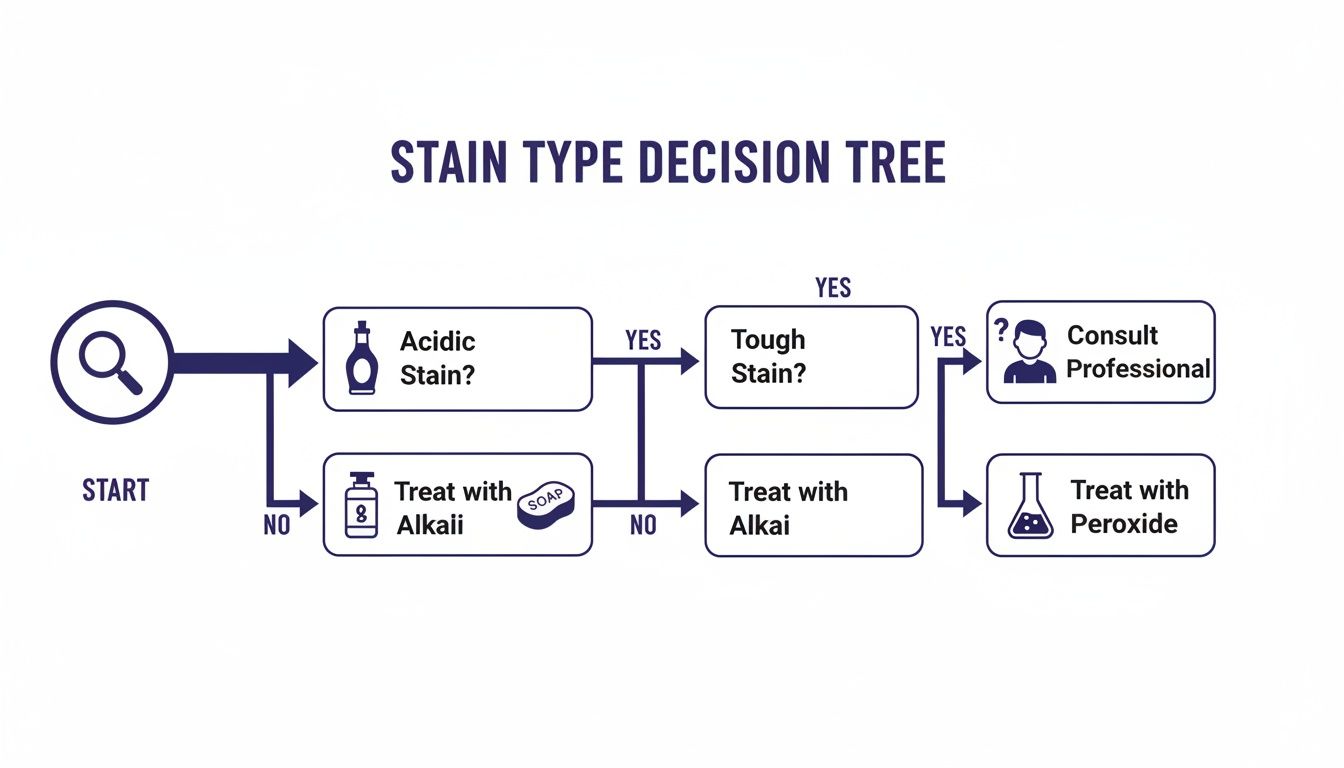
As you can see, the first thing to do is assess the stain. This helps you decide whether a simple acidic cleaner like vinegar will do the trick, or if you need to bring out the big guns like hydrogen peroxide.
Tackling Urine Stains—Fresh or Set
Night-time accidents are just a part of life, especially if you have young kids or pets. The good news is the resulting stain doesn’t have to stick around. Whether it's a fresh spot or an old yellowed one, the secret is using a cleaner that can break down the uric acid.
For a fresh urine stain, acting fast is everything. Grab a clean, dry cloth and blot the area immediately to soak up as much as you can. Press down firmly, but resist the urge to rub, as that just pushes it deeper.
Next, lightly spray the spot with your 50/50 white vinegar and water solution. The vinegar is brilliant at neutralising the ammonia smell. Let it sit for 10-15 minutes, then blot again with a new dry cloth.
Now for the magic ingredient: baking soda. Sprinkle it generously over the whole damp area. It will work to draw out any leftover moisture and odour. You need to leave it for at least 8-10 hours, or even overnight if you can manage it. Once the time is up, just vacuum it all away with your upholstery attachment.
For older, dried urine stains, you'll need a bit more oomph. Mix a solution of 240ml of 3% hydrogen peroxide, 3 tablespoons of baking soda, and a drop or two of clear dish soap. Lightly spray this onto the stain, let it dry completely, then vacuum up the white residue. Always test this on a small, hidden part of the mattress first, as peroxide can sometimes lighten certain fabrics.
How to Remove Blood Stains
Blood stains can look pretty dramatic, but they're manageable if you know the trick. There's one golden rule here: always use cold water. Hot water will cause the proteins in the blood to set, almost like cooking an egg, making the stain permanent.
If the stain is fresh, start by blotting it with a cloth dampened with cold water. Keep dabbing gently, switching to a clean part of the cloth, until no more blood is coming off.
Your best tool for this job is hydrogen peroxide. Carefully pour a small amount of 3% hydrogen peroxide directly onto the stain. You'll see it fizz and bubble up immediately—that’s a good sign! It means the peroxide is busy breaking down the blood.
Let it do its thing for a few minutes, then blot the area with a cold, damp cloth to rinse it. You might need to repeat this a couple of times until the stain is completely gone. To finish, blot with a dry towel and let the spot air dry thoroughly.
If you’re keen on more general mattress care tips, check out our guide on cleaning your mattress from top to bottom.
Dealing with Sweat and Body Oils
Over time, our sweat and natural body oils build up, causing those common yellow patches on a mattress. It's probably the most frequent issue we see in Kiwi homes, especially during those humid summer months.
To tackle these yellowed areas, your all-purpose vinegar spray is usually all you need. Give the stain a light misting and let it sit for about 10 minutes. This gives the vinegar time to start cutting through the oils.
After the vinegar has worked its magic, cover the spot with a thick layer of baking soda. Let it sit for several hours to soak up the oils and any odours. Finally, grab your vacuum and its upholstery tool and clear it all away.
If you're up against a really stubborn patch, try making a paste with baking soda, a pinch of salt, and a few drops of water. Spread it on, let it dry for about 30 minutes, then scrape off the excess before vacuuming.
Food and Drink Spills
A spilled glass of red wine or a morning coffee in bed can feel like a complete nightmare, but a quick response can save the day. As with most stains, the first thing to do is blot, blot, blot! Soak up as much of the liquid as you can right away.
-
For red wine, after blotting, you can sprinkle salt over the stain to help draw the colour out. Another great trick is a paste made from equal parts hydrogen peroxide and dish soap. Apply it sparingly, let it sit for a few minutes, then gently blot it away with a cold, damp cloth.
-
For coffee or tea, your trusty vinegar spray is the answer. Mist the area, let the vinegar sit for 10-15 minutes, and then blot firmly with a clean cloth. Repeat if needed until the stain lifts, then let it air dry completely. The key with dark liquids like these is to use your cleaning solution sparingly to avoid making the stain spread.
Proper Drying And Odour Elimination
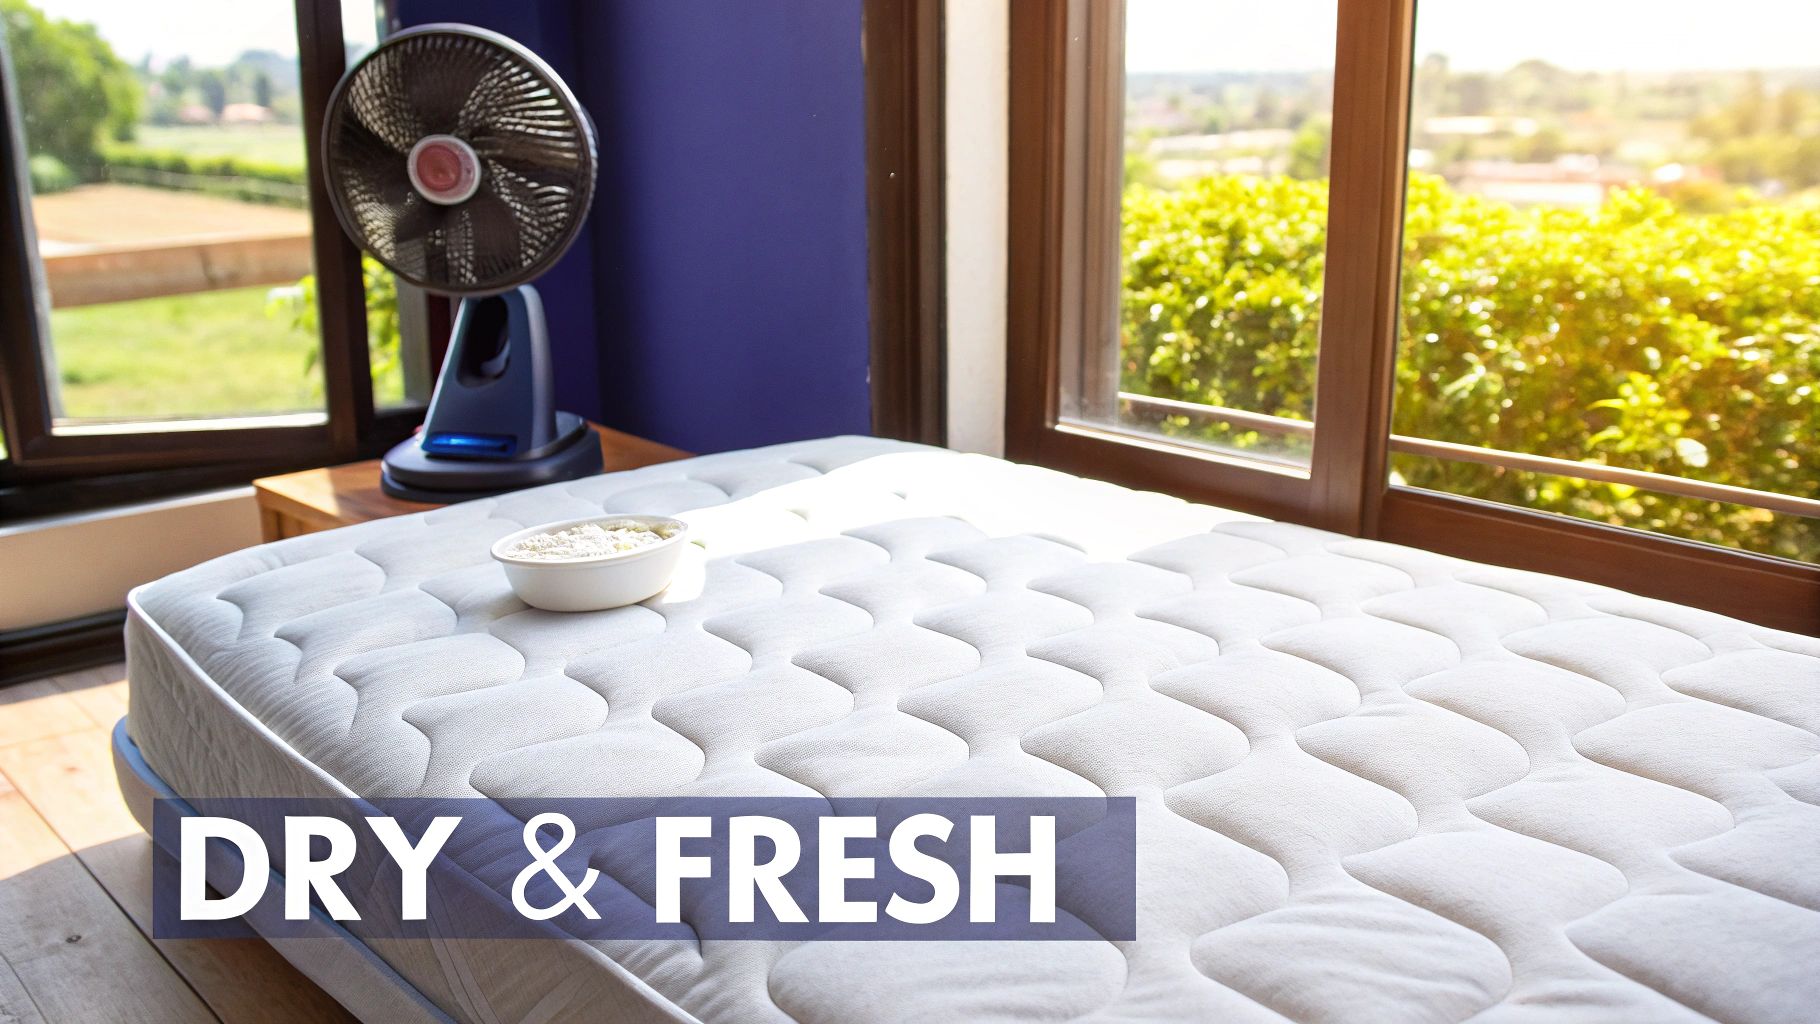
Getting that stain out feels like a victory, but don't put the sheets back on just yet. The next stage is absolutely crucial: making sure it’s bone dry. Any leftover moisture is a welcome mat for mould and mildew, creating a much bigger headache than the original spill.
I've seen it happen time and again – people rush the drying process and undo all their hard cleaning work. The key is to dry your mattress thoroughly but gently, leaving you with a sleep surface that's truly clean, fresh, and healthy.
Safe And Effective Drying Techniques
Your first thought might be to aim a hairdryer at the damp spot, but please, resist the urge. High, direct heat can actually set protein-based stains like blood or urine, permanently bonding them to the fibres. It can also cause real damage to sensitive materials like memory foam.
Patience and good old-fashioned airflow are your best friends here. These are the safest, most effective ways to get the job done:
- Get the Air Moving: Throw open the windows and point a fan directly across the damp area. This constant, gentle airflow is the most reliable way to dry things out.
- Blot, Blot, Blot: Before you do anything else, press a clean, dry towel firmly onto the wet patch. Don't be afraid to put your weight on it. You’ll be amazed how much moisture you can soak up this way.
- Use the Kiwi Sun (Wisely): If it’s a dry, sunny day, letting some natural sunlight hit the mattress can work wonders. UV rays are a fantastic natural disinfectant. Just be careful not to leave it in harsh, direct sun for hours, as this can degrade foam and cause the fabric to fade over time.
Given our often-damp climate in New Zealand, thinking about controlling humidity in your home can also make a big difference. A less humid room means your mattress dries faster and is less likely to develop musty smells in the first place.
The Ultimate Odour Removal Trick
Even when a stain is gone, a faint smell can sometimes hang around. This is where baking soda becomes your secret weapon. It’s a natural desiccant, which is a fancy way of saying it’s brilliant at absorbing both moisture and the particles that cause bad odours.
Once the mattress feels almost completely dry, sprinkle a very generous layer of baking soda over the entire treated area. Don't be stingy – you want a nice, thick coating.
Let the baking soda sit and work its magic for as long as you can. A minimum of four hours is good, but leaving it overnight is even better. This gives it plenty of time to draw out any deep-seated dampness and completely neutralise lingering smells.
After it has sat, just grab your vacuum, pop on the upholstery tool, and suck up all the powder. You’ll be left with a mattress that’s not just clean and dry, but smells genuinely fresh. To keep that pleasant bedroom atmosphere going, you might want to check out our elegant aroma diffusers.
Protecting Your Mattress From Future Stains
After all the effort of cleaning your mattress, the last thing you want is to be doing it all again next week. Let's be honest, the best way to deal with a stain is to stop it from happening in the first place.
Shifting from a reactive "oh no, a spill!" mindset to a proactive one is the key to protecting your investment. This isn't about adding a bunch of complicated chores to your list. It’s about creating a simple, effective defence against the usual suspects—spills, sweat, dust mites, and allergens.
Invest In A Quality Mattress Protector
If there's one thing you do, make it this: get a high-quality waterproof mattress protector. Think of it as insurance for your bed. It creates a solid barrier between your mattress and everything else, stopping liquids dead in their tracks before they can even touch the fabric.
This completely changes the game. A spilled coffee is no longer a frantic dash for towels and baking soda. Instead, you just whip off the protector and toss it in the wash. It’s an incredibly simple solution that saves you a world of stress and effort down the track.
A good protector does more than just stop spills. It also blocks sweat, body oils, dead skin cells, and dust mites from settling into your mattress, which helps to keep your bed feeling fresh and significantly extends its lifespan.
Here at New Zealand Bed Company, we’ve made sure our mattress protectors give you this peace of mind without sacrificing comfort. Forget those noisy, crinkly plastic sheets you might remember from childhood. Modern protectors are breathable, quiet, and soft, so you won’t even know it's there. To see what makes them so essential, check out our guide on why a waterproof mattress protector is a must-have.
Adopt A Simple Maintenance Routine
Beyond a protector, a few easy habits will keep your mattress in great shape. Weaving these into your regular cleaning schedule is a small effort that pays off big time for your mattress’s health and longevity.
For Kiwis, a simple but effective plan looks like this:
- Give it a regular vacuum. Every three to six months, use your vacuum’s upholstery tool to go over the entire surface. This gets rid of the dust, skin cells, and allergens that gather in the quilt lines.
- Tackle spills straight away. Even with a protector on, it's best to clean up any spills on your bedding quickly to stop them from soaking through to the protector itself.
- Let it breathe. Each time you change the sheets, leave the mattress bare for a few hours. This lets any trapped moisture evaporate—a really important step in New Zealand's more humid climates.
This proactive approach isn't just common sense; it's backed by local experts. Sleepyhead New Zealand found that a shocking 50% of mattresses over five years old contain mould from untreated stains. This problem is linked to a 28% increase in allergy-related doctor visits since 2019. Sealy agrees, recommending a vacuum every 3-6 months, which they say can prevent up to 70% of stain progression just by removing surface dust. You can find more local mattress care recommendations over at Bedpost.
Your Mattress Cleaning Questions Answered
Even with the best guide in hand, you’re bound to have questions when you’re elbow-deep in stain removal. It’s completely normal to second-guess yourself, especially when you’re trying not to make a small problem bigger.
To help you out, we’ve gathered the most common questions our Kiwi customers ask us. Think of this as your personal troubleshooting guide for those tricky “what if” moments.
Can I Use a Steam Cleaner on My Mattress?
This is a big one we hear all the time, and our honest answer is: please don’t. It feels like a logical way to get a deep, sanitising clean, but steam cleaners can do serious, irreversible damage to your mattress.
The combination of intense heat and moisture is the real problem here. That pressurised steam forces water deep into the foam and fabric layers. For materials like memory foam or latex, that heat can actually break down their structure, ruining the very thing that makes them supportive.
Worse still, all that trapped moisture creates a warm, damp environment—the perfect breeding ground for mould and mildew. Given New Zealand’s often-humid climate, that’s a risk you really don’t want to take.
Heads up: Using a steam cleaner or a hot water extraction machine will almost certainly void your mattress warranty. Stick to the spot-cleaning methods we’ve shown you, and always use as little liquid as possible.
When Should I Call a Professional Cleaner?
DIY methods are brilliant for most everyday spills and stains, but some jobs are just too big for a home remedy. Knowing when to wave the white flag and call in the professionals can be the difference between a clean mattress and a ruined one.
It’s probably time to find a local expert if you’re dealing with:
- A massive or deeply soaked stain. If a lot of liquid has gone right through, a pro has the right gear to safely extract it without leaving moisture behind.
- A stubborn smell that won’t quit. You’ve tried the baking soda trick and aired it out, but that musty or unpleasant odour is still there. This often means moisture is trapped deep inside.
- Signs of mould or mildew. See any black or greenish spots? Notice that distinct musty smell? Don’t try to tackle this yourself. Professionals have the right treatments to handle it safely.
- An old, mysterious stain. If you have a set-in stain of unknown origin that just won’t budge, an expert has access to specialised solutions that might just do the trick.
How Often Should I Clean My Mattress?
A simple, consistent cleaning routine is your best bet for keeping your mattress fresh and hygienic for the long haul. You don’t need to go overboard every weekend, but a little regular maintenance goes a long way.
Here’s a practical schedule that works for most Kiwi homes:
- Every couple of months: Give the mattress a thorough vacuum with an upholstery attachment. This simple step gets rid of dust, skin cells, and other allergens.
- Twice a year: Time for a deeper clean. Spot-treat any small stains you see, then give the whole surface a good deodorising with a generous sprinkle of baking soda.
- Immediately: Accidents happen. The key is to treat spills the moment they occur. Acting fast is the secret to preventing a stain from setting in.
Will DIY Cleaning Void My Mattress Warranty?
This is a really important question. The last thing you want to do is void the warranty on such a big investment. The good news is that gentle spot-cleaning with mild, approved solutions (like the ones we’ve covered) is usually fine.
Where people get into trouble is by using harsh chemicals like bleach or ammonia, or by completely soaking the mattress with liquid. These actions can damage the foams and fabrics inside, and that kind of damage won’t be covered.
Your safest bet is to always check the care label on your mattress first. It will have specific instructions from the manufacturer. When in doubt, stick with the basics: a little baking soda and a lightly damp cloth. If you have more general questions, you can always check out our detailed FAQs page for New Zealanders.
Ready to make cleaning a non-issue? The best defence is a good offence, and in this case, that means a high-quality mattress protector. At New Zealand Bed Company, we have a range of comfortable, breathable, and fully waterproof protectors designed to shield your bed from spills, sweat, and allergens. Invest in one today and sleep a little easier. Shop our mattress protectors now.